Bare Bones Boot
Quick Intro: There are numerous reasons why a computer will not startup or "boot" properly. When this is due to problematic hardware it is not always easy to pinpoint the culprit and that is when the "Bare-Bones-Boot Steps" below can be most helpful.
The POST and the BIOS Set-Up
When first turned-on, computers go through a POST (Power-On-Self-Test). Along with other things, always check that there is a good CMOS battery when there is a failure to POST. If during the Power-On processes all the attached hardware is detected as normal it is usual for there to then be:-
- [A] A single beep from the case speaker. (It can be normal for this to be absent; rarely there can be a normal second beep).
- [B] An option presented on the screen to press a specific "hot key" to get into the BIOS/CMOS Set-Up facility; (see http://www.michaelstevenstech.com/bios_manufacturer.htm for additional details).
- [C] An attempt to load an operating system from the devices indicated in the Boot Order section of the Set-Up facility. (Note that even if no bootable device is found there should be a message about the failure on the display and/or some error beeps).
The POST beep(s)
If you know and can remember that your PC used to normally emit a single (sometimes a double) beep whenever it was turned on and before the OS started to load and it now doesn't then you almost certainly have some faulty hardware that is preventing a successful POST. Any, YES ANY, piece of faulty hardware can prevent a successful POST. Nearly all PCs do at some stage emit a successful POST beep. Some do it at every restart but some only do it on one single occasion after the BIOS/CMOS set-up facility has been successfully updated or reset.
Updating/Resetting the BIOS/CMOS memory settings
Updating the CMOS settings may be done automatically on many modern systems whenever new hardware is attached to the motherboard or when existing hardware is detached or it may be capable of being done manually by altering the BIOS/CMOS set-up settings. These settings can also be reset to their defaults by removing all power to the PC and then removing the CMOS battery (Fig 2.) for long enough to allow the non-volatile memory (normally kept charged by the battery) to fully discharge. Ten to fifteen minutes should be ample especially if the power-on button is pressed-in after all mains power and the CMOS battery have been removed from the motherboard. The process can also be done on some motherboards by changing a "reset CMOS" jumper for a similar period. If really in doubt leave the unpowered motherboard with no CMOS battery attached to it overnight. When reset has occured the date and time settings in the set up facility should have been set to a designated default time and date in the past.
The Case Speaker
The POST beep(s) emanate from a case speaker and not from any external speakers. The case speaker may be attached to two pins on the front panel headers as in Fig 1 or be integral ("on board") and soldered to the motherboard as in Fig 2.
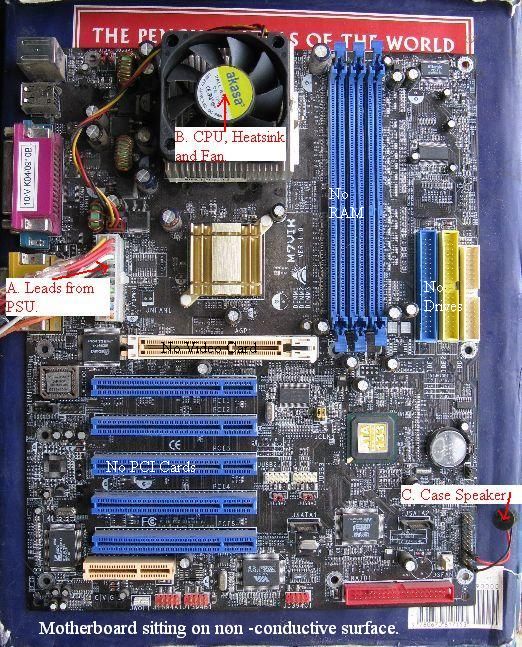 Fig 1.
 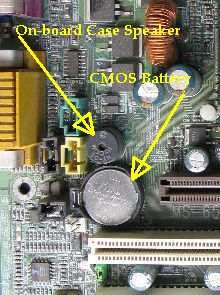 Fig 2.
Warning Beeps
A case speaker can and should also generate beeps (BIOS beep codes) to indicate certain problems with hardware. Removing all RAM (as in Fig 1.) should cause a series of warning beeps to sound when the motherboard is asked to boot up. This is a useful way of checking that the case speaker is functional.
Motherboard Preparation
The motherboard in Fig. 1. has been prepared for a bare-bones-boot. It has been removed from its case and placed on a non-conductive surface. All peripherals and cables have been detached from all external and internal ports with the exception of [A] the PSU, [B] the CPU/Heatsink/Fan assembly and [C] the Case Speaker. To be pedantic, the CMOS battery is still in situ and that may be a necessity. A PC may start-up enough to enter the BIOS setup without a CMOS battery but of course all settings will be lost as soon as power from the motherboard is removed. Note that some systems will not startup at all or complete their POST without a fully charged (normally 3 volt) battery. Be particularly suspicious of a bad or discharged battery with systems that have been left unpowered for months or years. It should also be noted that some Operating Systems will not load correctly when there is an incorrect system date typically caused by a run-down or absent CMOS battery.
Bare-Bones-Boot Steps
- Have the motherboard removed and prepared as in the above paragraph.
- Connect mains supply to the PSU (and if it has a switch turn it on).
- Short the two power-on pins on the front panel header for just a moment with something like a small screwdriver tip or, as in Fig 3, with a spare jumper.
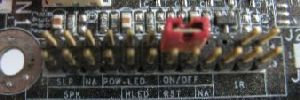 Fig 3.
(This is all that is needed to fire-up a modern ATX motherboard. On older AT systems from about 1996 and earlier the power-on contact must be made and then kept in place. AT boards have completely different connectors coming from an AT PSU; 12-pins often in two banks of six rather than the 20-pins that are found on early ATX PSUs (Fig 4). There are some ATX connections that have 24 pins. Some ATX systems also have an accessory 4-pin (Fig 5) or 8-pin connector that must be attached to the motherboard from the PSU for a successful POST to occur).
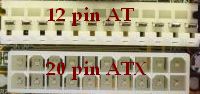 Fig 4.
  Fig 5.
- The case speaker should emit a sequence of beeps because no RAM is attached. If so you know that the speaker is good.
- You can now attach just one stick of RAM (motherboard unpowered at the time) and try another restart. If you now get a successful POST beep you know that the motherboard and CPU and PSU and RAM are basically going to be OK.
- You can then start adding back hardware (piece by piece) till you find the culprit which is causing the failure to POST.
- Try adding the monitor (or video card and monitor) and keyboard as the next step because, if all goes according to plan, you would then be able to access the BIOS setup, when the necessary key-press is indicated on the display. (Tip: if the display screens fly past too quickly then hit the <Pause> key to freeze and the <Esc> key to continue).
Bare-Bones-Boot Failure
If there is no successful POST beep try again but with the CMOS battery removed. Next at least try and see if you can get ANYTHING to show on the display by attaching the monitor. Basically if a bare-bones-boot fails you have a problem with the speaker and/or the motherboard and/or the CPU and/or the PSU. Unfortunately there is no quick way of identifying the culprit for the average PC owner other than swapping-in known good components.
Of all such failed components the PSU may well be the most common (or it may be attached incorrectly or incompletely) and is what we generally would check first. It is usually harder and more expensive to swap in a CPU or Motherboard but we have no other way of determining which would be the culprit. Don't forget that if one component has blown that it could have taken-out any other attached components and this commonly happens, for example, with power surges such as those cause by lightning strikes in the area.
Always take note during an attempted bare-bones-boot of whether any LCDs come on and which, if any, fans start to spin. Such indications of power reaching the board militate against the PSU being the culprit but are not however diagnostic that the PSU is good.
No Display on Monitor
A failure to complete the POST should also mean that there is no normal display on the monitor. A successful POST however can still mean that there is no display and that usually indicates a failed monitor or a bad cable/connection or a failed or badly seated video card.
- Check that the display produces some output (if only transient) when turned-on while not attached to the PC.
- Double-check the cable and its connections - in particular that there are no missing pins and that neither of the ports are loose.
- Reseat the video card firmly and even try cleaning the contacts with something like a pencil eraser.
- Finally, as with other items, try swapping-in known good parts.
Appendices
(i) The acronyms BIOS (Basic Input Output System or Built In Operating System) and CMOS (Complemenatry Metal Oxide Semiconductor) are commonly used interchangeably when they are in fact discrete entities. The BIOS contains or is a de facto software program that runs on a "ROM" chip from the moment a computer is started-up. This ROM chip is made from EEPROM (Electrically Erasable Programmable Read Only Memory) so to be pedantic it isn't truly Read Only though it is necessary to "Flash the BIOS" in order to reprogram it. This program has some permanently stored values and functions in its EEPROM memory but also accesses other data stored in NVRAM (Non Volatile Random Access Memory) maintained in a separate CMOS chip for as long as power from its CMOS battery (or other source such as the motherboard when it is powered) keeps it charged.
(ii) Front Panel Connections vary from motherboard to motherboard and usually the power on/off switch pair of pins is clearly marked. Some advice on this page or consult your motherboard manual for specifics. It doesn't matter which way round the wires to the the power-on or reset switches go since these just complete a straightforward circuit like pressing a bell-push on someones front door. The LCD switches if connected the wrong way round wont do any harm but the LCD lights wont then come on when they are supposed to.